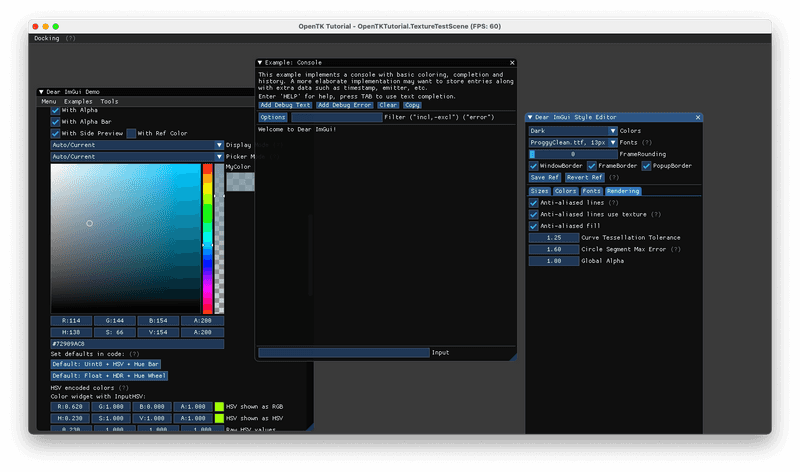
ImGuiはC++で書かれたバックエンドのグラフィックスAPIに依存しないGUIライブラリで、主にデバッグ・エディタUIの実装用途で、ゲームエンジンなどで広く利用されています。 C#ではImGui.NETという上記のラッパーライブラリが提供されています。
著者は最近OpenTKを利用してOpenGLを勉強しているのですが、アプリ中のパラメータを調整するためのUIをスクラッチで実装するのも大変なので、このImGuiを導入して効率化を図れればと思っています。
そこで今回はImGuiをOpenTK上で動作させるようにしてみたいと思います。リファレンスにいくつか実装上参考にした記事を記載していますが、手元のmacではそのまま動作しなかったので(主にプラットフォームやGLのバージョン等)、それ含め書き直したものになります。
著者の動作環境は下記のとおりです。
- macOS Big Sur
- Intel Iris Plus Graphics 640
- .NET 5.0.100
- OpenTK 4.4.0
- ImGui.NET 1.78.0
今回作成したImGuiController.csはこちらで確認できます。
ImGuiの動作とOpenTK上で動かすには
ImGuiは前述の通りバックエンドのグラフィックスAPIに依存しないライブラリです。つまり、OpenGLやDirectX、VulkanやMetalだけでなくなんなら自作のレンダラを実装したとしても導入が可能です。 その原理としてはImGuiでGUIを記載してレンダリングすると、そのGUIを描画するのに最適化された頂点情報および頂点インデックスの情報がグラフィックスライブラリに依存しない形で生成されるからです。 その頂点情報をもとに各バックエンドごとに描画処理を実装することで、それぞれのバックエンドでGUIを描画することができます。
OpenTK(内部的にはOpenGLラッパーですが)上でImGuiを動作させたければ、OpenTK向けの描画処理を記述する必要があります。
具体的には下記の実装を行います。
- ImGuiのコンテキスト生成、頂点バッファやシェーダー、フォントアトラスのテクスチャ、入力処理などを初期化する
OnUpdateFrameImGuiの定期処理を行うOnRenderFrameでImGuiのレンダリングを行い頂点情報を生成する- 3.の頂点情報を元にGUIを描画する
それでは順番に見ていきます。
ImGuiの初期化
まずはImGuiが必要とするリソースを初期化します。まずはじめに、ImGuiのコンテキストを生成し、カレントコンテキストとして登録します。
// ImGuiクラスは、`ImGuiNET`配下
var context = ImGui.CreateContext();
ImGui.SetCurrentContext(context);複数のコンテキストを持ちたい場合は、ImGui.SetCurrentContextで切り替えることもできます。今回は1つでOKなので切り替え実装は行っていません。
次に、頂点と頂点インデックス・頂点配列の初期化を行います。ImGuiの頂点は下記の構造体で渡ってきます。
using System.Numerics;

namespace ImGuiNET
{
    public struct ImDrawVert
    {
        public Vector2 pos;
        public Vector2 uv;
        public uint col;
    }
}それぞれ頂点の要素はこの順番で配置されていて、それぞれposは位置座標(ワールド座標)、uvはフォントテクスチャのuv座標、colは頂点カラーが格納されています。
colについては、rgbaチャンネルそれぞれの情報が1byteずつでパックされていています。そのため頂点属性としては4要素となります。また、それぞれの値は0255になりますがOpenGLでカラー情報は01で扱う必要があるために、正規化を有効にします。
// VertexBufffer, IndexBuffer, VertexArrayはint型
VertexBuffer = GL.GenBuffer();
IndexBuffer = GL.GenBuffer();
VertexArray = GL.GenVertexArray();

// 頂点属性を設定
GL.BindVertexArray(VertexArray);
GL.BindBuffer(BufferTarget.ArrayBuffer, VertexBuffer);
GL.BindBuffer(BufferTarget.ElementArrayBuffer, IndexBuffer);

// ImGuiの頂点情報
var stride = Unsafe.SizeOf<ImDrawVert>();

// 位置情報(vec2)
GL.EnableVertexAttribArray(0);
GL.VertexAttribPointer(0, 2, VertexAttribPointerType.Float, false, stride, 0);

// uv(vec2)
GL.EnableVertexAttribArray(1);
GL.VertexAttribPointer(1, 2, VertexAttribPointerType.Float, false, stride, 8);

// 頂点カラー(vec4)
GL.EnableVertexAttribArray(2);
// カラーは値事態はuintで、それぞれ1byteにrgbaでそれぞれのチャンネルの値が入っている。
// そのため要素数は4。0 ~ 255で渡ってくるため正規化も行う
GL.VertexAttribPointer(2, 4, VertexAttribPointerType.UnsignedByte, true, stride, 16);

GL.EnableVertexAttribArray(0);

// バッファの割り振り解除
GL.BindBuffer(BufferTarget.ElementArrayBuffer, 0);
GL.BindBuffer(BufferTarget.ArrayBuffer, 0);
GL.BindVertexArray(0);
上記に合わせて、シェーダーとプログラムを作成します。シェーダー自体はシンプルで、バーテックスシェーダーではプロジェクション行列を乗算してクリッピング空間へ座標変換し(頂点自体がUIでの配置を前提として渡ってくる。なので頂点を平行投影すればOK。)、フラグメントシェーダーでは、uv座標からフォントテクスチャを引くのと頂点カラーを乗算して描画します。
var vertexShaderSource = @"#version 330 core
uniform mat4 projection_matrix;
layout(location = 0) in vec2 in_position;
layout(location = 1) in vec2 in_texCoord;
layout(location = 2) in vec4 in_color;
out vec4 color;
out vec2 texCoord;
void main()
{
    gl_Position = projection_matrix * vec4(in_position, 0, 1);
    color = in_color;
    texCoord = in_texCoord;
}";
var fragmentShaderSource = @"#version 330 core
uniform sampler2D in_fontTexture;
in vec4 color;
in vec2 texCoord;
out vec4 outputColor;
void main()
{
    outputColor = color * texture(in_fontTexture, texCoord);
}";

var vertexShader = new Shader(ShaderType.VertexShader, vertexShaderSource);
var fragmentShader = new Shader(ShaderType.FragmentShader, fragmentShaderSource);

// Programはint
Program = GL.CreateProgram();
GL.AttachShader(Program, vertexShader.Id);
GL.AttachShader(Program, fragmentShader.Id);
GL.LinkProgram(Program);
次にフォントテクスチャを生成します。フォントテクスチャ自体は設定に応じてImGuiが生成してくれるので、その情報をもとにOpenGLの2DTextureを生成します。
今回はio.Font.AddFontDefaultでImGuiのデフォルトのフォント設定を行います。ImGuiの保持しているフォントテクスチャの情報はio.Fonts.GetTexDataAsRGBA32で取得できます。画像の横幅・縦幅、画像の格納されているポインタ情報が返却されるので、その情報を元にテクスチャを生成します。
var io = ImGui.GetIO();

// create font atlas
io.Fonts.AddFontDefault();

IntPtr fontTexturePixels;
io.Fonts.GetTexDataAsRGBA32(out fontTexturePixels, out var fontTextureWidth, out var fontTextureHeight, out var fontTextureBytesPerPixel);
FontAtlasTexture = new Texture(fontTextureWidth, fontTextureHeight, fontTexturePixels);
io.Fonts.SetTexID((IntPtr)FontAtlasTexture.TextureId);
io.Fonts.ClearTexData();ちなみにTextureクラスのコンストラクタは下記のとおりです。
public Texture(int width, int height, IntPtr data)
{
    Width = width;
    Height = height;
    TextureId = GL.GenTexture();

    GL.BindTexture(TextureTarget.Texture2D, TextureId);

    GL.TexImage2D(TextureTarget.Texture2D, MimpapLevels, PixelInternalFormat.Rgba, Width, Height, 0, PixelFormat.Rgba, PixelType.UnsignedByte, data);

    GL.TexParameter(TextureTarget.Texture2D, TextureParameterName.TextureWrapS, (int)TextureWrapMode.Repeat);
    GL.TexParameter(TextureTarget.Texture2D, TextureParameterName.TextureWrapT, (int)TextureWrapMode.Repeat);
    GL.TexParameter(TextureTarget.Texture2D, TextureParameterName.TextureMagFilter, (int)TextureMagFilter.Linear);
    GL.TexParameter(TextureTarget.Texture2D, TextureParameterName.TextureMinFilter, (int)TextureMagFilter.Linear);

    GL.BindTexture(TextureTarget.Texture2D, 0);
}
入力周りも初期化していきます。OpenTKのキーマップとImGuiのキーマップを対応づけます。
var io = ImGui.GetIO();

io.KeyMap[(int)ImGuiKey.Tab] = (int)Keys.Tab;
io.KeyMap[(int)ImGuiKey.LeftArrow] = (int)Keys.Left;
io.KeyMap[(int)ImGuiKey.RightArrow] = (int)Keys.Right;
io.KeyMap[(int)ImGuiKey.UpArrow] = (int)Keys.Up;
io.KeyMap[(int)ImGuiKey.DownArrow] = (int)Keys.Down;
io.KeyMap[(int)ImGuiKey.PageUp] = (int)Keys.PageUp;
io.KeyMap[(int)ImGuiKey.PageDown] = (int)Keys.PageDown;
io.KeyMap[(int)ImGuiKey.Home] = (int)Keys.Home;
io.KeyMap[(int)ImGuiKey.End] = (int)Keys.End;
io.KeyMap[(int)ImGuiKey.Delete] = (int)Keys.Delete;
io.KeyMap[(int)ImGuiKey.Backspace] = (int)Keys.Backspace;
io.KeyMap[(int)ImGuiKey.Enter] = (int)Keys.Enter;
io.KeyMap[(int)ImGuiKey.Escape] = (int)Keys.Escape;
io.KeyMap[(int)ImGuiKey.A] = (int)Keys.A;
io.KeyMap[(int)ImGuiKey.C] = (int)Keys.C;
io.KeyMap[(int)ImGuiKey.V] = (int)Keys.V;
io.KeyMap[(int)ImGuiKey.X] = (int)Keys.X;
io.KeyMap[(int)ImGuiKey.Y] = (int)Keys.Y;
io.KeyMap[(int)ImGuiKey.Z] = (int)Keys.Z;
ImGuiの定期処理
定期処理では、前フレームとの差分時間によりフレームを更新する処理と、入力を処理します。ちなみにOpenTKではGameWindowクラスのOnUpdateFrameを継承すると定期処理をフックできるので、このメソッド内で処理します。
定期処理の全容は下記のとおりです。
public void Update(double deltaTime)
{
    SetPerFramImGuiData((float)deltaTime);
    UpdateInput();
    ImGui.NewFrame();
}SetPerFrameImGuiDataでは、そのタイミングでのディスプレイ情報および、そのフレームで進んだ時間をImGuiに伝えます。
private void SetPerFramImGuiData(float deltaTimeSeconds)
{
    var io = ImGui.GetIO();
    io.DisplaySize = new System.Numerics.Vector2(WindowWidth / ScaleFactor.X, WindowHeight / ScaleFactor.Y);
    io.DisplayFramebufferScale = ScaleFactor;
    io.DeltaTime = deltaTimeSeconds;
}UpdateInputでは入力を処理します。と言っても、OpenTKの入力情報を、そのままImGuiに伝えているだけです。
private void UpdateInput()
{
    var io = ImGui.GetIO();

    // Windowは動いているGameWindowのインスタンス
    var MouseState = Window.MouseState;
    var KeyboardState = Window.KeyboardState;

    // マウスの情報
    // マウスクリック
    io.MouseDown[0] = MouseState[MouseButton.Left];
    io.MouseDown[1] = MouseState[MouseButton.Right];
    io.MouseDown[2] = MouseState[MouseButton.Middle];
    // マウスの現在位置
    var screenPoint = new Vector2i((int)MouseState.X, (int)MouseState.Y);
    var point = screenPoint;
    io.MousePos = new System.Numerics.Vector2(point.X, point.Y);

    // キー入力
    foreach (Keys key in Enum.GetValues(typeof(Keys)))
    {
        if (key == Keys.Unknown)
        {
            continue;
        }

        io.KeysDown[(int)key] = KeyboardState.IsKeyDown(key);
    }

    // キーボード入力
    foreach (var c in PressedChars)
    {
        io.AddInputCharacter(c);
    }
    PressedChars.Clear();

    // コントロールキーの入力
    io.KeyCtrl = KeyboardState.IsKeyDown(Keys.LeftControl) || KeyboardState.IsKeyDown(Keys.RightControl);
    io.KeyAlt = KeyboardState.IsKeyDown(Keys.LeftAlt) || KeyboardState.IsKeyDown(Keys.RightAlt);
    io.KeyShift = KeyboardState.IsKeyDown(Keys.LeftShift) || KeyboardState.IsKeyDown(Keys.RightShift);
    io.KeySuper = KeyboardState.IsKeyDown(Keys.LeftSuper) || KeyboardState.IsKeyDown(Keys.RightSuper);
}最後にImGui.NewFrameでImGuiのフレームを更新します。
ImGuiのレンダリング処理
あとは、レンダリング処理内で頂点情報を生成して、実際に描画を行います。OpenTKではGameWindowクラスのOnRenderFrameを継承すると定期処理をフックできるので、このメソッド内で処理します。
レンダリング処理の全容は下記のとおりです。
public void Render(double deltaTime)
{
    // ImGuiのレンダリングを行い頂点情報を作成
    ImGui.Render();
    // その頂点情報を描画する
    RenderImDrawData(ImGui.GetDrawData());
}ImGui.Renderを呼び出すとそのフレームでのUIの頂点情報が生成されます。頂点情報はImGui.GetDrawData()で取得できます。頂点を描画するRenderImDrawDataの全容はこちらです。要点は下記のとおりです。
- 画面サイズをもとにバーテックスシェーダシェーダーにわたすプロジェクション行列の生成し、転送する
- パイプライン設定を行って、現在のフレームバッファに対して最前面にUIを描画する設定を行う。
- 頂点を転送して描画する
まず、バーテックスシェーダーにわたすプロジェクション行列を作成します。前述の通り頂点を平行投影します。合わせて生成した行列をユニフォーム変数としてGPUに転送します。
var projectionMatrix = Matrix4.CreateOrthographicOffCenter(
    0.0f,
    io.DisplaySize.X,
    io.DisplaySize.Y,
    0.0f,
    -1.0f,
    1.0f
);

GL.UseProgram(Program);
GL.UniformMatrix4(GL.GetUniformLocation(Program, "projection_matrix"), false, ref projectionMatrix);
次にパイプライン設定を行います。現在のフレームバッファに対して、最前面になるように描画するように設定します。また位置情報は2Dで渡ってくるので、デプステストはオフにしておきます。生成される頂点の都合、フェイスカリングもオフにします。
GL.Enable(EnableCap.Blend);
GL.Enable(EnableCap.ScissorTest);
GL.BlendEquation(BlendEquationMode.FuncAdd);
GL.BlendFunc(BlendingFactor.SrcAlpha, BlendingFactor.OneMinusSrcAlpha);
GL.Disable(EnableCap.CullFace);
GL.Disable(EnableCap.DepthTest);
最後に頂点を描画していきます。ImGuiの描画情報はコマンドリストという描画情報の集合で構成され、その中に頂点や頂点インデックスなどの描画情報が格納されています。あわせてコマンドリスト内にコマンドバッファが複数存在していて、頂点の描画情報(頂点オフセットなど)が格納されています。
// 頂点配列をバインドして、頂点属性の情報を設定
GL.BindVertexArray(VertexArray);

// フォントテクスチャをバインド
FontAtlasTexture.ActiveTexture(TextureUnit.Texture0);
FontAtlasTexture.BindTexture();

// 描画情報は複数のコマンドリストからなる
for (var i = 0; i < data.CmdListsCount; ++i)
{
    var commandList = data.CmdListsRange[i];

    // コマンドリスト内で描画する頂点および頂点インデックスをGPUに転送
    GL.BindBuffer(BufferTarget.ArrayBuffer, VertexBuffer);
    GL.BufferData(BufferTarget.ArrayBuffer, commandList.VtxBuffer.Size * Unsafe.SizeOf<ImDrawVert>(), commandList.VtxBuffer.Data, BufferUsageHint.StreamDraw);
    GL.BindBuffer(BufferTarget.ArrayBuffer, VertexBuffer);

    GL.BindBuffer(BufferTarget.ElementArrayBuffer, IndexBuffer);
    GL.BufferData(BufferTarget.ElementArrayBuffer, commandList.IdxBuffer.Size * sizeof(ushort), commandList.IdxBuffer.Data, BufferUsageHint.StreamDraw);
    GL.BindBuffer(BufferTarget.ElementArrayBuffer, IndexBuffer);

    for (var j = 0; j < commandList.CmdBuffer.Size; ++j)
    {
        var commandBuffer = commandList.CmdBuffer[j];
        // ユーザーコールバックは非対応
        if (commandBuffer.UserCallback != IntPtr.Zero)
        {
            throw new NotImplementedException();
        }

        // クリッピング
        var clip = commandBuffer.ClipRect;
        GL.Scissor((int)clip.X, WindowHeight - (int)clip.W, (int)(clip.Z - clip.X), (int)(clip.W - clip.Y));

        // 頂点描画。頂点オフセットをオプションに入れているかどうかでバッファの情報が変わるのでその対応
        if ((io.BackendFlags & ImGuiBackendFlags.RendererHasVtxOffset) != 0)
        {
            GL.DrawElementsBaseVertex(PrimitiveType.Triangles, (int)commandBuffer.ElemCount, DrawElementsType.UnsignedShort, (IntPtr)(commandBuffer.IdxOffset * sizeof(ushort)), (int)commandBuffer.VtxOffset);
        }
        else
        {
            GL.DrawElements(BeginMode.Triangles, (int)commandBuffer.ElemCount, DrawElementsType.UnsignedShort, (int)commandBuffer.IdxOffset * sizeof(ushort));
        }
    }
}
これでUIが描画されます。
GameWindowからImGuiControllerを呼び出す
上記のImGuiControllerをOpenTKのGameWindowから動かすには下記のように実装します。
using ImGuiNET;
using OpenTK.Windowing.Common;
using OpenTK.Windowing.Desktop;
using OpenTK.Graphics.OpenGL4;

namespace OpenTKTutorial
{
    public class TestImGuiControllerWindow : GameWindow
    {
        public ImGuiController ImGuiController { get; private set; }

        public Window(IScene firstScene) : base(
            new GameWindowSettings()
            {
                IsMultiThreaded = true,
                RenderFrequency = 60.0,
                UpdateFrequency = 60.0,
            },
            new NativeWindowSettings()
            {
                APIVersion = new System.Version(3, 3),
                Flags = ContextFlags.ForwardCompatible,
            }
        )
        {
            CurrentScene = firstScene;
        }

        protected override void OnLoad()
        {
            base.OnLoad();
            ImGuiController = new ImGuiController(Size.X, Size.Y, this);
        }

        protected override void OnUnload()
        {
            base.OnUnload();
            ImGuiController?.Dispose();
        }

        protected override void OnResize(ResizeEventArgs e)
        {
            base.OnResize(e);
            GL.Viewport(0, 0, e.Width, e.Height);
            ImGuiController.Resize(e.Width, e.Height);
        }

        protected override void OnUpdateFrame(FrameEventArgs args)
        {
            base.OnUpdateFrame(args);
            ImGuiController.Update(args.Time);
        }

        protected override void OnRenderFrame(FrameEventArgs args)
        {
            base.OnRenderFrame(args);
            // 試しにDemoWindowを描画
            ImGui.ShowDemoWindow();
            ImGuiController.Render(args.Time);
            Context.SwapBuffers();
        }

        // 詳細は省いたが、マウスホイールやテキスト入力もハンドリング
        protected override void OnMouseWheel(MouseWheelEventArgs e)
        {
            base.OnMouseWheel(e);
            ImGuiController.OnMouseScroll(e.Offset);
        }

        protected override void OnTextInput(TextInputEventArgs e)
        {
            base.OnTextInput(e);
            ImGuiController.AddInputCharacter((char)e.Unicode);
        }
    }
}
まとめ
ImGuiについてかんたんな紹介と、ImGuiバックエンド実装として、OpenTK上でImGuiを動かすための仕組みとその方法について説明しました。
ImGuiによってUI実装が簡単になったので、有効活用してGL学習を進めていきたい。
